Last updated: 2026/6/1
Use two-factor authentication
Enabling two-factor authentication (2FA) enhances account security by requiring an additional piece of authentication information in addition to your password during login.
Enable Two-Factor Authentication
- Navigate to Account Settings -> Security.
- Click [Enable] in the lower right corner.
- Enter your SocialDog account password and click [Next].
- Install an authenticator app on your smartphone or other device.
- Google Authenticator (iOS, Android)
- Microsoft Authenticator
- Other apps that support Two-Factor Authentication via TOTP (Time-Based One-Time Password)
- Scan the QR code using your authenticator app.
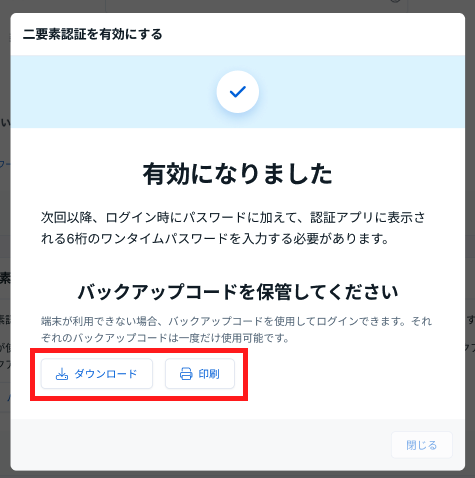
- Enter the 6-digit one-time password displayed in your authenticator app into the field on the screen. → Two-factor authentication will be enabled.
- To store your backup codes, click [Download] or [Print] and keep them in a secure location.
If the QR code cannot be scanned by your authenticator app
- Hover over [Cannot scan?].
- Manually enter the "Account Name" and "Key" into your authenticator app.
- The account will be added to your authenticator app, and a 6-digit one-time password will be displayed.
Log In with a Two-Factor Authenticated Account
Accounts with two-factor authentication enabled can be logged into using the following steps:
- Access the login screen.
- Enter your email address and password, then click [Log In].
- Enter the 6-digit one-time password displayed in your authenticator app, then click [Authenticate] to log in.
tip
- If you are unable to log in with two-factor authentication, please refer to Unable to Log In to SocialDog.
- When logging in with a Google or Apple account, SocialDog's two-factor authentication will not be required.
Disable Two-Factor Authentication
Two-factor authentication can be disabled using the following method:
- Navigate to Account Settings -> Security.
- Click [Disable] in the lower right corner.
- A confirmation screen will appear; click [Disable] to disable two-factor authentication.